Sunday, January 15, 2012

Hand in Hand


This particular transformation I have been very excited for because it was inspired off one of my favorite animated movies, Up. In the beginning of up there is about 5 min montage of the character life it starts on their wedding day and shows them growing older and older until Carl the main character come home from his wife's funeral. Well I think it one of the most beautiful thing I've seen and can't help but cry every time I watch it. It inspired me to do old age makeup. I wanted to take a guy and a girl and have their wedding pictures be the first photo on the page and then make them grow old and older. Lucky for me this passed summer my brother Jordan and his beautiful wife Kelsey got married. So I had wedding photos and they were the perfect couple to be my models.

 When considering what I wanted to do I first thought about what ages I wanted to do. People told I should go up every 20 years because five to 10 years you don't change that much. Then I realized you actually do change if you really have an attention to detail so I thought that would be a good thing to show the colleges that I am apply to. So I went up every 10 years to show a natural slow progresses state of their transformation.

 Wrinkles how to: You take a makeup brush that is small and flat, similar to a paint brush. Then you get some brown, white and tan stage makeup. To make the wrinkle have the person make a face that creases the area you want to age. For the eyes you would have them close their eyes really tight to create crease line around the eyes. Then you take a draw brown lines in those creases. The blend out and add white and tan to make them pop.

 30's I really didn't do much I just made them a little more seasoned. I add a little grey just to the side of the hair, added some darker lines under the eyes and a little bit of crows feet in the corners of the eyes. 


40's I added more grey to the hair I style Kelsey's hair a little different giving her a at home mother look. I gave Jordan a weekend business man look. I then added some more wrinkles under the eyes to the forehead, also smile line wrinkles.


 50's I started to shorten Kelsey's hair because most women as they age their hair starts to get shorter, then I added more grey. For wrinkles I added some to the forehead, middle of the, eyebrows, and smile lines with more eye wrinkles. My brother Jordan, well its hard to get his hair to much of anything except stand straight up. I parted on the side a used bobby pins to make it lay flatter, then added more grey.


 Tips for this look:
really do some research for me that just mean lot of picture of old people and aging. Also look at family members I got a lot of inspiration from my family and looked at how we age because all people age differently some better then others.


 Hint for next look: Life goes on.


                                                                                                                      My Siblings


Here is the opening from Up.

Blizzard

For this look it was my personification of a blizzard. I got the idea from my sister who went to a natural disaster Halloween party and dress up as a hurricane. I thought it would be cool to do this on in winter with the snow and just my luck there was no snow this winter. The picture and look still turned out cool so, it's all good.


 I started off curling the all of my sister hair. In loose curls, if hair has curls in it it teases easier. Once the entire head is curled, I started teasing the crap out of her hair. I split her hair on the drastic part, put bobby pins in her hair at the front and made a fake finger wave. Then I wanted to make it look like her hair was blowing in the wind or was frozen. So a combed the hair flat to the right side of her hair. And started pinning away at her hair. Then I added a little white spray to the top of the bun to make it look like snow or like ice.

 For the makeup I wanted to use a lot of white, silver and light blue, because those color gave the look more frozen look. I started off using some pale foundation and set that with some white powder. After I made her face pale, I went to the eyes. I still want to keep them pale but for photo reasons I need to define them a little bit. I first applies white eye shadow all over the lids. Then I took silver and lined the top lashes Then taking black liquid liner I lined the top lashes but in sparse jagged lines kind of like icicles. I then took silver liquid liner and did the same thing but also extended the silver out from the corners of the eyes. I took white liner and started drawing organic icicles coming down the face, I also did that with silver and silver liquid liner. I finish off the makeup by applying silver and white eyeshadow to the lips to make them look frozen. For the costume I just grabbed a bunch of white winter things. Then also I wanted the costume to have an edge to it to match the hair but to also suggest that blizzard are not always fluffy and white, but do have an edge to them. A cold and dark fear, when they do hit towns and cities.


 Tips for this look:
1) Really play up the hair and tease the crap out of it, don't be affraid to use a lot of bobby pins I think I used over 65 total in Casey's hair.
2) Stick to a lot of whites and silvers thin looks that remind you of winter.


Hint for next look:
It started with a promise,
We sealed it with a kiss,
This journey, this path
Hand in hand.

Masquerade

I picked this look because of my love for the musical Phantom of the Opera. One of my favorite song and scenes from the musical and movie is the song Masquerade. I thought it would be fun to come up with a masquerade look but make it a little different and a little more unique.


For the makeup look you will need lace, threaded beads, and liquid eyeliner. I started out by taking foundation and applying it to the face, then I set the foundation with some loose powder. For the eyes I took a gold shimmer shadow and applied it all over the eye lid. Then came the fun part I took black lace that I got at a local craft store and I cut them out to the shape of the eye lid up to the eye brow. Then once I got them to the shape I wanted and so they matched, I took eyelash glue and glued them to the eye lids. Then to clean up the edging of the lace I took some black liquid liner drew in a solid edging. On the bottom of the eyes I wanted to match the dramatic lace on the top so I took some black thread, and threaded up some blacks and silver beads and used eyelash glue again to attach them to the bottom lash line. Then I finished off the look with a little bit of blush and a nice red lip.


 For the hair I wanted it to match the the makeup but have a soft elegant flair to it. I curled the all of her hair. I started in the back took a section of hair started curling at the top of the section then once I worked the hair through I took it off the barrel leaving it in it shape. Then took that section and pinned it in place and worked my way through all the hair. Once that was done I took all the sections out and was left with a very curly head of hair. I pulled all the hair up to the top of the head and started pinning away. I left some curls out at the front to soft the edging and give it a more romantic look. 


Tips for this look:
1)take your time and make sure that the lace shape is the same. Make sure to let all the glue set before you let go of it.
2)Have fun with it if you don't like the beads on the bottom try something else maybe some fun bottom lashes.


 Hint for next look: Poppin bottles in the ice.

Friday, November 4, 2011

1920's


            This past week was Halloween and it’s one of my favorite time of year, because it's when people really appreciate my talent for hair and makeup. Last year I did my sisters hair and makeup and turned her into a punk rock chick that almost looked like a modern day pin up girl. People ask me all the time to do their hair and makeup, but I really love creating looks for costumes. My sister asks me all the time for hair and makeup ideas, and I always try my best to help her out. Over the summer my sister went to a 1920's costume party and asked me to make a hair and makeup look for her. She likes to be as authentic as possible when attempting any look.  Unfortunately, my being in Wisconsin and her in New York made it a little more challenging, because I couldn't just do it myself.  I did the next best thing and I made videos and put them up on YouTube for her to watch. When I uploaded the videos I didn't think twice.  I figured that no one was going to actually watch them but her. Well, to my surprise when I checked my old email over the weekend I saw a bunch of YouTube email notices. Curious, I logged into my YouTube account to find I had well over 5,000 views. Let's just say I was shocked and from what I saw it seemed like people kinda liked it. So I have been checking on it every day all week and in 3 days it has gone up to almost 7,000 views.  I am guessing that since it was Halloween girls were dressing up as flappers and looking for a video on how to do 1920's hair. That's when they came across me and my video on 1920's hair. So this week instead of writing about my transformation, I am going to post my two videos.  Please ignore my appearance for the most part and the quality.  Like I said I posted them and didn't expect people to actually watch them.  I guess that's what is so amazing about the Internet.  If you put it out there, people can see it.  Still, I was sick when I made them so I speak quietly and I don't really know how to explain what I am doing. All in all, it was a pretty good first attempt and I hope you enjoy them.  I think they will explain things better when you get to see it step by step.

Tips for this look:
1) Don't be afraid to be too dramatic with your makeup, it was the roaring 20's and they didn't care they were on drugs. Haha
2) Make sure you don't drop your Bobby pins (said in a British accent).

Hint for next transformation: Hide your face so the world will never find you
           

Mother Earth


            When coming up with different themes and ideas for my portfolio, I started breaking things into different categories. I had basic theatre makeup, time periods, and cartoons. Then I came across the idea to do characters based on nature and the environment. I decided to do my own twist on mother earth to start off the nature section. Since I was putting this entire transformation together and not having a specific reference I had to get creative. I thought about what mother earth stood for and what she protected. I thought about the Amazon right away and how people are going in and chopping down trees and killing animals.  I then pictured mother earth standing in the middle of the Amazon as a giant tree that wouldn't fall or move no matter what.  She simply stood there protecting all the plants and animals.  She was the heartbeat of earth and kept everything safe and alive. Then the entire concept for the hair, makeup and costume came to me.

            For the makeup I designed parts of the face to represent the patterns of different animals the mother earth cares for.  Under my eye I layered a shimmer purple shadow to give my face a sleek wet look. Then with a dark purple eyeliner I drew in a fish scale pattern. For my right eye I began with a white face paint and then set that with a white eyeshadow. Then with a black liner I drew in big dramatic Zebra stripes. On my forehead I used a goldish yellow color and then with a brown liner I drew in random blogs of brown. Then in the middle of that a white liner. You can look at pictures of cheetahs to help with the pattern. Then I did small little dashes with black liner next to the cheetah to look like snake skin. At the top I put more white face paint and set it with white eye shadow. Then I took more liquid liner and drew furry looking black blobs, leaving the middle clear. I looked at pictures of white leopards for this pattern. Then coming off of my right eye, I took a brown liner and drew a line curving down and then added lines going off of it like a feather. Then I took a light blue liner and added a circle then green, more brown, and purple, to look like a peacock feather.  This entire concept is very subjective and any of these patterns can be used anywhere on the face.  Get creative and use whatever animals inspire you.


For the hair I wanted to keep it flowing and natural, like I just came out of the ocean. I didn't want to do nothing, so I started off with a chunk of hair and twisted it over and across my head and secured with Bobby pins. Then I started making small braids all over my head. Once all the small braids were done, I connected random braids together. I was thinking of the vines of a tree when I came up with this idea and how they are all connected to the tree just all with different paths to get to the base.

            For the costume I kept it fairly muted in colors and simple, because I really wanted the makeup to pop. So I drew up a short brown dress and over the dress a baggy white shirt that says "Save the Whales" with a almost sketch like whale on the shirt, with a rope belt bunching the shirt. I wanted to keep the dress short so that I could paint the legs to look like bark on a tree. So that when I stood it was like I was a tree planted into the ground and connected to all thing living. Then, on the arms I used spirit gum to attach leaves and panted some vines connecting them together. So when I lifted my arm I was like the branches of a tree.
Tips for this look:
1) look up picture of animal for patterns and use ones that speak to you.
2) Get creative with the braid and all the connections; keep them random.

P.S. I didn't have time to do this look on anyone so I just tested it out on me first.

Hint for Next Week:
  The change came with erotic fashions, literature and movies, and an unsuspected sexual aid, the automobile.

1930's

a more womanly look, unlike the 20's when short hair and the boy silhouette was in fashion.  The women of the 30's wanted to feel like the women of the household with a more womanly silhouette and a little longer hair.

            For a daily look, women wore their hair swept back with a gentle wave to it and curls on the end. To get this look, use gel hair spray and a curling iron. Start out by curling the hair and make sure the curls are soft at the end. Then add a nice soft wave to the front and pin in place. They still did finger waves in the 30's, they just weren't as harsh and flat to the face as in the 20's. For an evening look take that hair and twist to the side hair. Then, add a low bun with some pins and keep it loose.

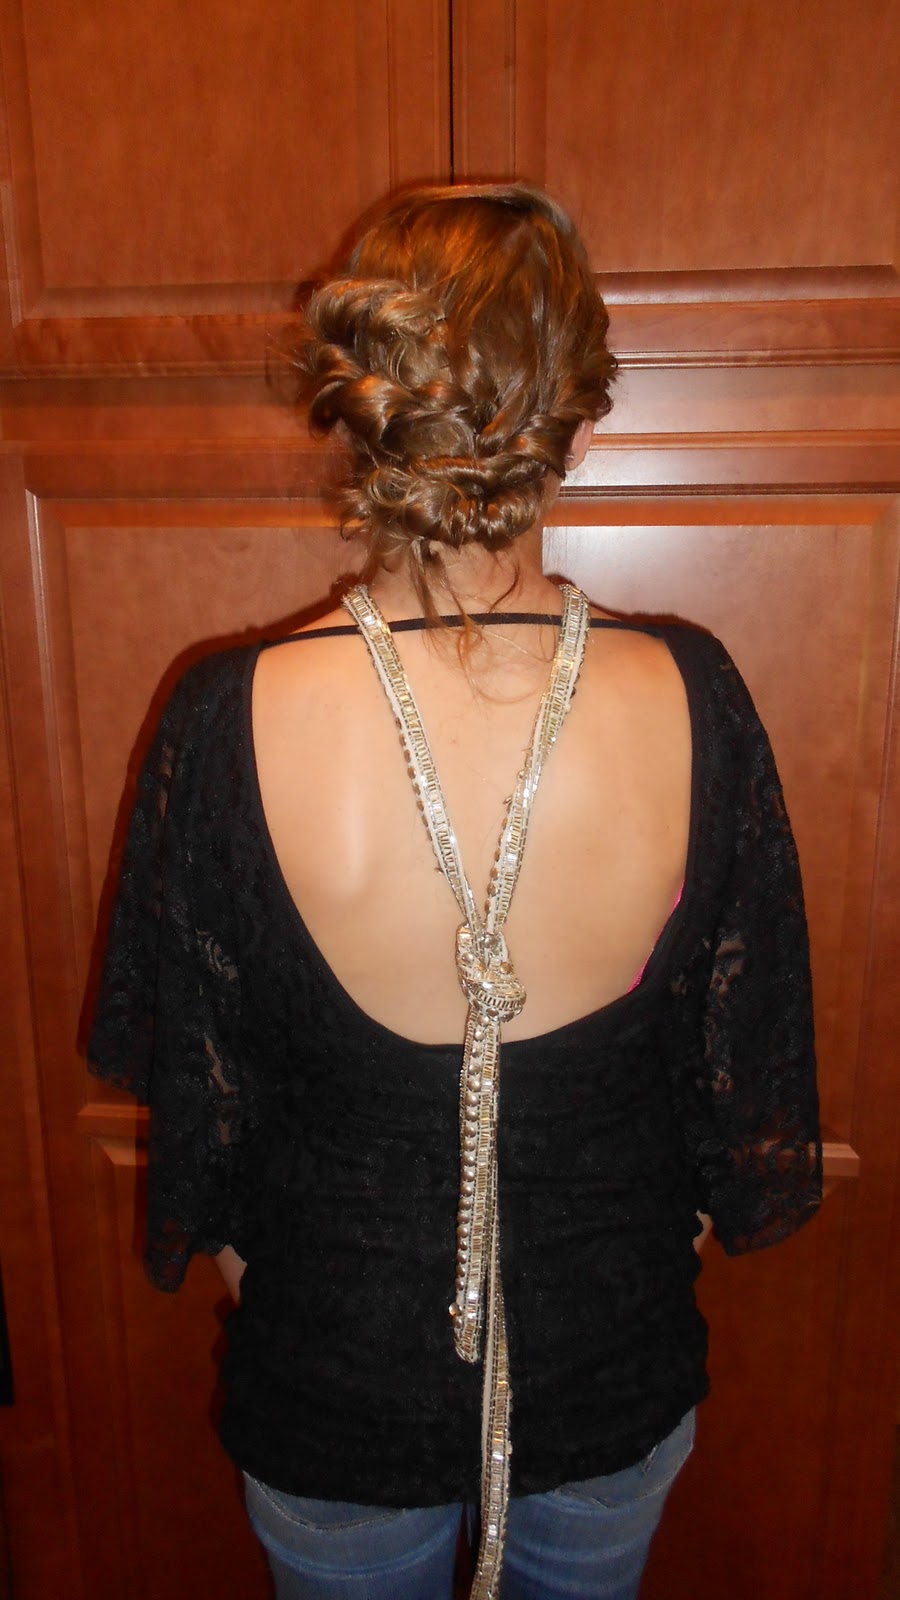
            For a woman's daily makeup look, I took a foundation, usually an olive color and set it in with some loose powder. Then, I added a soft pink blush on the cheeks. During the day many women just wore vaseline on their eyes for a nice flown and a little eyeliner, usually brown during the day with some mascara. For the lips, I used a reddish pink.  I started by adding the lipstick to the center lip and extending it out into defined cupids bow. In the 30's they wound extend the lip stick up to make a more heart shape. For a night look, I made the make up a little darker. I started off by adding a little more blush to the cheek and black liner to the  eyelid and a waterline on the bottom lid.  Since my model Jessie had brown hair, I added a purple which was a popular color for brunettes to use as eye shadow during the 30's. Then I put a dark brown eye shadow on the outer corners to darken the eyes and give it a nice evening look. In the picture I used a low cut back top which was a popular cut on dresses in the 30's. Tan skin was in and women wanted to show them off, so they wore dresses cut low in the back and wore their necklaces in the back instead of the front.

Tips for these looks:
1) Keep the makeup simple if you want it to be true to the time period during this time most women didn't have money for a lot of makeup.
2) Make sure you think "traditional womanly look" and do research so you understand what the women were trying to say with their clothes during whatever time period look you are going for.

Hint for next transformation: She is the heartbeat of the earth.


Pocanotas

 If you remember back or read back in my blogs, the first transformation I did was the Disney character Mulan. In order to complete the Disney to Life page for my second transformation I chose Pocahontas. I loved the movie Pocahontas growing up, though it might have been my massive crush on John Smith, but like Mulan, her courage is what captured me. For this look I started off my research a lot like Mulan's look. I watched the video and looked at pictures and cross referenced those images with photographs of real Native Americans.

            Pocahontas's hair is pretty straight forward: really long and really black. Finding someone with that hair and that in any way resembled Pocahontas well was a different challenge. That's when I thought of my friend Amanda.  She has darker skin and dark hair. Her hair wasn't as long as Pocahontas, so my first thought was to use a black wig. Then, I figured that would not look very realistic. So, I came up with the idea to make my own clip in hair extensions. I started off with a simple long black wig and cut off large piece of it. Then I took that hair and hot glued it across a Bobby pin, I did this about 20 times to create my own homemade extensions. Then, I went through Amanda's hair and placed the extensions to give her length. Her hair was a little lighter than the extensions so I sprayed those parts of her hair black to even it out. I then pulled all the hair to one side and put some wave in it to simulate a wind blown look.

            The makeup required a lot of bronzer and conturing of the face. I started off by darkening Amanda's skin and then darkened the side of her nose to thin it out.  Then, I contoured to make her cheek bones pop.  Conturing is all about creating shadows to make the face appear different and in this case angular. For her eyes, I used a brown shadow to off set the eyes with a black liner. Pocahontas is very natural, so I wanted to keep the make up pretty simple. Pocahontas lips are very full luckily so are Amanda's so I started off with a brown lip liner and fill the lips with a dark brown. Then, I finished off the look with a shimmer to highlight on the nose, cupids bow, and a little on the cheeks.

Tips for this look:
1) Make sure you study the shape of her face and nose for contouring.
2) make sure the hair black hair spray is worked into the hair and not just all as once it will make it look more real.

Hint for next transformation:  You'll be greatly depressed if you miss this time in history.